Installation Instructions for Multi-Function Copiers
Save To DynaFile Headless Service Installation Instructions
The steps below outline the steps required to install the Save To DynaFile Headless Service which will securely upload files from your local network (typically created by scans from a multi-function copier) into the DynaFile system under both Batch and Barcode processing.
Minimum Installation Requirements:
- Shared or dedicated server, either physical or virtual
- Windows server 2012 or greater
- 1 GB of disk space
- 1 GB of RAM
- Single 1.5+ GHz CPU
- .NET Framework 4.7+
Pre-Installation Steps:
- Create a folder on a server (preferably on the same server that the service will be installed on) as the parent folder for the scanned files (e.g. D:\DynaFile).
- Share this folder on the server, preferably with the name of “DynaFile” and assign the proper NTFS and share permissions so that the copy/scanning device can write to this share.
- Create two sub-folders in this folder called “Barcode” and “Batch”.
- Create a new scan destination on the multi-function copier or other scanning device named “DynaFile - Barcode” that saves files to the share (e.g. \\myserver\dynafile\barcode). You will probably have to provide the proper domain credentials to save to the share as required by the copier.
- Set the scan destination to scan in a black & white, multi-page TIFF format at 300 dpi. If the copier is unable to specify the format on a per-destination basis, then ensure that the users are instructed on how to change the format manually per-scan. If TIFF format is unavailable, then PDF format is acceptable, but not preferred. Make absolutely certain that color scans are not the default scanning method as they will create overly large files in DynaFile.
- Repeat steps #4 and #5 for the Batch destination (name of “DynaFile – Batch” and save location like \\myserver\dynafile\batch).
- Have the DynaFile administrator create a new user account that will be used by the utility to upload the files and provide that accounts credentials to you.
- The username must be a valid email format, but not a valid address. Most clients use the format of copiername@mycompany.com.
- The First and Last Name can simply be some sort of copier ID/Name/Serial Number.
- The administrator will need to provide (preferably a randomly generated) password, by clicking on the “Manually Set Password” link.
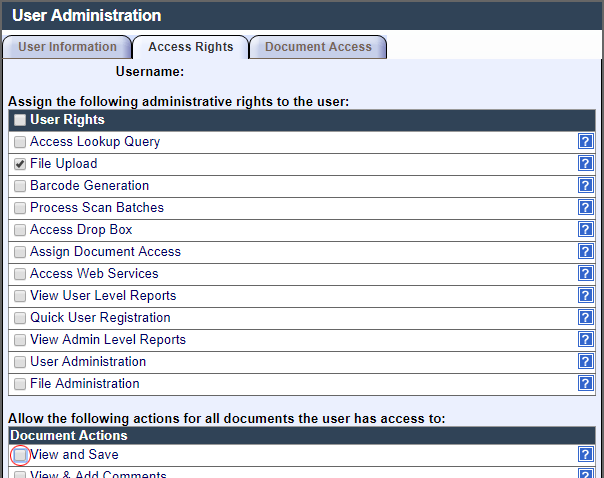
The only “Access Rights” the user should have is “File Upload”. The “View and Save” action permission can be un-checked for security purposes.
Service Installation:
- Download the installer from the following link:
https://downloads.dynafile.com/SaveToDynaFileService_x64_v2.1.33.msi
- Perform the installation using all the default values
- After installation, it is recommended to go to Start > SaveToDynaFile Service Configuration and pin to either Start menu or the Taskbar.
Service Configuration:
- Start the SaveToDynaFile Service Configuration
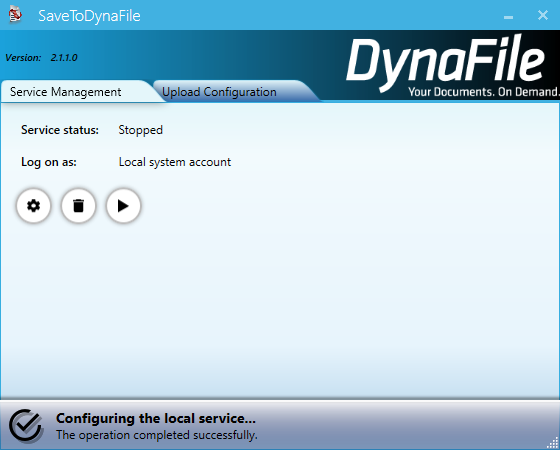
- On the first tab/screen named “Service Management” click on the gear icon.
- If the share and the service are on the same server, then leave the “Local system account” selected. If, however, the share is on a separate server, you will need to specify the appropriate network or user account credentials. When complete, click on the save icon.
- Do NOT click on the run icon at this time.
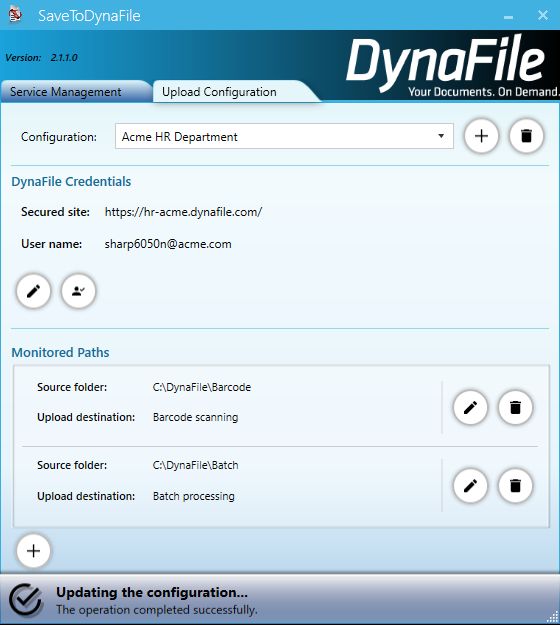
- Click on the second tab named “Upload Configuration” and click the add/plus icon.
- In the “Configuration name” box, simply enter a descriptive name (typically your company or domain name and perhaps a department name).
- For the “Secured site”, enter in just the sub-domain of your DynaFile account. For example, if your DynaFile site is accessible at https://acme.dynafile.com, then simply enter “acme”. Once entered, click the save icon and the account credentials will be validated.
- Under the “Monitored Paths” section, click on the add/plus icon.
- Next to “Source folder” enter the path configured in the pre-installation step #3 for the barcode folder.
- Next to “Upload destination” select “Barcode scanning” and click the save icon.
- Repeat steps #8 through #10 for the “Batch” folder and destination.
- Click back on the “Service Management” tab and click on the run/arrow icon.
- The service should start normally and any documents scanned to the barcode and batch folders configured should be uploaded to DynaFile within 10 seconds of the scan completion.
- Should you wish to view the processing logs, you can view them at
C:\ProgramData\Blue Ribbon Technologies\SaveToDynaFile Service\Logs. - It is highly recommended that the individual configuring this service perform a test scan on the copier to both the DynaFile Barcode and Batch destinations. Once complete, they should inform their DynaFile Account Manager of these scans so that the configuration can be validated prior to training of the users.
Multi-Office Configuration Steps:
All the steps above are tailored around the configuration of a single scanning device (multi-function copier) to upload to DynaFile. When installing and configuring the Save To DynaFile Headless Service in an environment where there will be multiple scanning devices, especially in disparate locations, there are some slight configuration changes that may be needed. Below are two options available when configuring scanning from multiple locations.
For the first option, which is the easiest to setup, you can simply configure all scanning devices (copiers) to point to the same shares (e.g. \\myserver\dynafile\barcode and \\myserver\dynafile\batch). In this situation, the SaveToDynaFile Headless Service will simply process and upload the files as received regardless from which scanning device they came from. It is however, recommended that the default file name generated from the copier include some sort of identifier for the copier or location so that it is easier to track which device originated the scan (e.g. Houston-20170101.tif). While this method is the easiest to configure from an IT perspective, it does limit the capabilities for the DynaFile administrator(s) to lock users down to specific scan queues for security purposes.
The second option provides the capability for each scanning device to scan to its own queue (whether for barcode or batch processing) which means that the DynaFile Administrator can lock users down to only viewing scans that originated from their own scanner/copier. This option uses the concept of DynaFile Offices. The following items should be noted as additional/differing steps than are outlined above in a multi-office configuration.
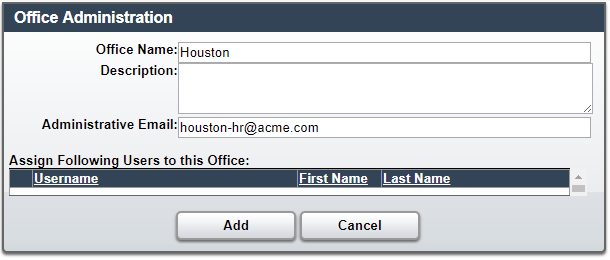
- The DynaFile administrator creates a new Office by going to Admin > Office Administration and clicking on the [Add New Office] They will then provide an office name and administrative email and choose any users they wish to assign to that office and then they click the [Add] button.
- It is imperative that after creating a new office, that the DynaFile Administrator contact their DynaFile Account Manager in order to activate the new office. This step can only be performed by DynaFile support staff.
- For step #7 under the Pre-Installation Steps listed above, the DynaFile administrator will create a separate account for each scanning/copier device and ensure that the account is configured to the specific “Office”. The account name may be something like location-copiername@mycompany.com to assist with future understanding of why the account exists.
- The IT group will adjust steps #3 and #4 under the Pre-Installation Steps listed above so that there is a separate share for each location/office. For example, if there are two locations (e.g. Austin and Dallas), the shares on your network may look similar to the following with a separate batch and barcode sub-folder for each location:
\\myserver\dynafile\dallas\barcode
\\myserver\dynafile\dallas\batch
\\myserver\dynafile\austin\barcode
\\myserver\dynafile\austin\batch
- For step #6 under Service Configuration section, you will create a new entry for each office/scanner/copier. The add/plus icon next to the “Configuration” text box will allow for creation of additional shares to monitor. Typically, the name of the configuration is specific to the copier and/or office location. The credentials will need to be specific to the accounts created under item C above and the Monitored Paths will be associated to the shares created under item D above.